Getting started with processing.py, this article follows the instructions found here:
http://py.processing.org/tutorials/gettingstarted/
- The first step is to download the processing IDE here.
- Once downloaded create a “processing_py” folder on your desktop and drag the “processing-3.3.6” folder from the .zip into the new folder.
- Inside this folder, click the processing.exe file and the IDE will open. (No need for a traditional .msi install.) Note: This IDE is called the Processing Development Environment (PDE).
- On the upper right hand side of the IDE, click the Java down arrow and select “Add Mode…”. This will allow you to add Python (and optionally p5.js) as shown in this graphic:

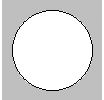
The rest of the Getting Started example shows how to create a simple circle with this code. The syntax is ellipse(x, y, w, h) where x and y are the location to place the ellipse on the screen and w and h are the width and height of the ellipse.
ellipse(50, 50, 80, 80)
which looks like this in the browser:
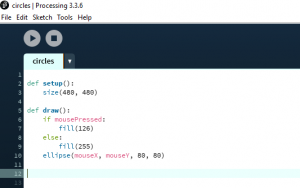
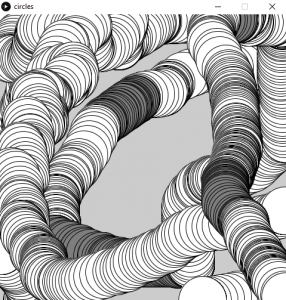
Then it shows how to create an interactive “sketch” that involves drawing circles interactively by following the mouse pointer and changing color of the circles by holding down the mouse button. The code in the IDE looks like this:
And here is an example of the output:
Here is the Processing Python code with some comments added to explain what the code is doing:
def setup():
    """ A function to create the browser window that the code output will be
    displayed in"""

    # size is the width and height of the output window in pixels
    # size(w, h)
    size(480, 480)

def draw():
    """ This function controls the graphics that are displayed on the screen
    as well as user mouse events that control the graphics."""

    # mousePressed is a key word that gives boolean True if the mouse is pressed
    if mousePressed:

        # fill is like a paint bucket that fills the shape with whatever color
        # is indicated. Colors are indicated as 0 (black) to 255 (white) (HEX)
        fill(126)
    else:
        fill(255)

    # ellipse is what draws a circle
    # The four arguments are:
    # ellipse(x, y, w, h)
    # 1. # pixels from the left of the screen
    # 2. # pixels from the top of the screen
    # 3. width in pixels
    # 4. height in pixels
    ellipse(mouseX, mouseY, 80, 80)