This article describes how to create a custom HTML range slider using Bootstrap 3, jQuery, HTML, CSS, and a JavaScript package called “bootstrap-slider”. There are download and installation instructions for this package on github.
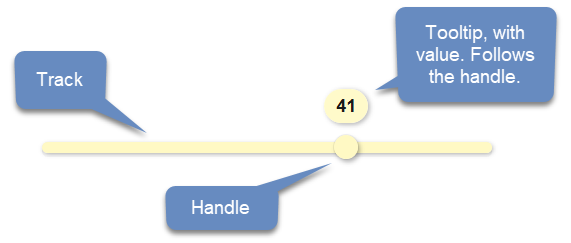
This slider can be custom styled with CSS and comes with a built-in tooltip. See the graphic below for a description of the different parts of the slider.
Step 1: Set up CDNs
The first thing we need in our HTML document is to set up CDNs to Bootstrap 3, jQuery, bootstrap-slider .js file and bootstrap-slider .css file. For example:
<!-- Bootstrap 3 CSS  -->
<link rel="stylesheet" href="https://maxcdn.bootstrapcdn.com/bootstrap/3.3.5/css/bootstrap.min.css">

<!-- jQuery  -->
<script src="https://code.jquery.com/jquery-3.3.1.min.js"></script>

<!-- bootstrap-slider js + css  -->
<script src="https://cdnjs.cloudflare.com/ajax/libs/bootstrap-slider/10.2.0/bootstrap-slider.min.js"></script>
<link rel="stylesheet" href="https://cdnjs.cloudflare.com/ajax/libs/bootstrap-slider/10.2.0/css/bootstrap-slider.min.css" />
Bootstrap 3:
https://maxcdn.bootstrapcdn.com/bootstrap/3.3.5/css/bootstrap.min.css
jQuery:
https://code.jquery.com/jquery-3.3.1.min.js
bootstrap-slider files:
https://cdnjs.cloudflare.com/ajax/libs/bootstrap-slider/10.2.0/bootstrap-slider.min.js
https://cdnjs.cloudflare.com/ajax/libs/bootstrap-slider/10.2.0/css/bootstrap-slider.min.css
Note: The Bootstrap 3 and jQuery CDNs should be declared before the bootstrap-slider files.
Step 2: Set up HTML
<input id="ex1" data-slider-id='ex1Slider' type="text" data-slider-min="0" data-slider-max="20" data-slider-step="1" data-slider-value="14"/>
To make the slider, set up a”type=text” input tag with some slider arguments such as:
- data-slider-id (the name of the slider)
- data-slider-min (the minimum value in the range)
- data-slider-max (the maximum value in the range)
- data-slider-step (increment by units of this number)
- data-slider-value (a starting value for the slider)
Step 3: Set up custom CSS
Instead of pasting all of the custom CSS code here, I will embed a slider I saved in Codepen:
See the Pen Bootstrap-slider with tooltip always visible by Chris Nielsen (@Chris_Nielsen) on CodePen.
As seen in this codepen, you can customize details such as slider color, height, length, handle size and tooltip.
Step 4: Instantiate the slider with jQuery or JavaScript
Here is some JavaScript that will make it so that the tooltip is always visible (as seen in the above codepen):
// Without JQuery
var slider = new Slider("#ex1", {
   tooltip: 'always'
});
Or, if you only want to see the tooltip when dragging the handle, here is some jQuery:
$('#ex1').slider({
  formatter: function(value) {
    return value;
  }
});
For example:
See the Pen Bootstrap-slider with tooltip by Chris Nielsen (@Chris_Nielsen) on CodePen.
For more information on bootstrap-slider, see:
https://github.com/seiyria/bootstrap-slider
https://seiyria.com/bootstrap-slider/
For more information about HTML range sliders, see:
https://www.w3schools.com/howto/howto_js_rangeslider.asp